When considering a movie, most people think of the picture quality and graphics without feeling the sound. Surely good graphics and a high-quality image resolution will give you a fantastic experience.
The only thing that can top it off is a good sound system that allows you to hear everything the characters say.
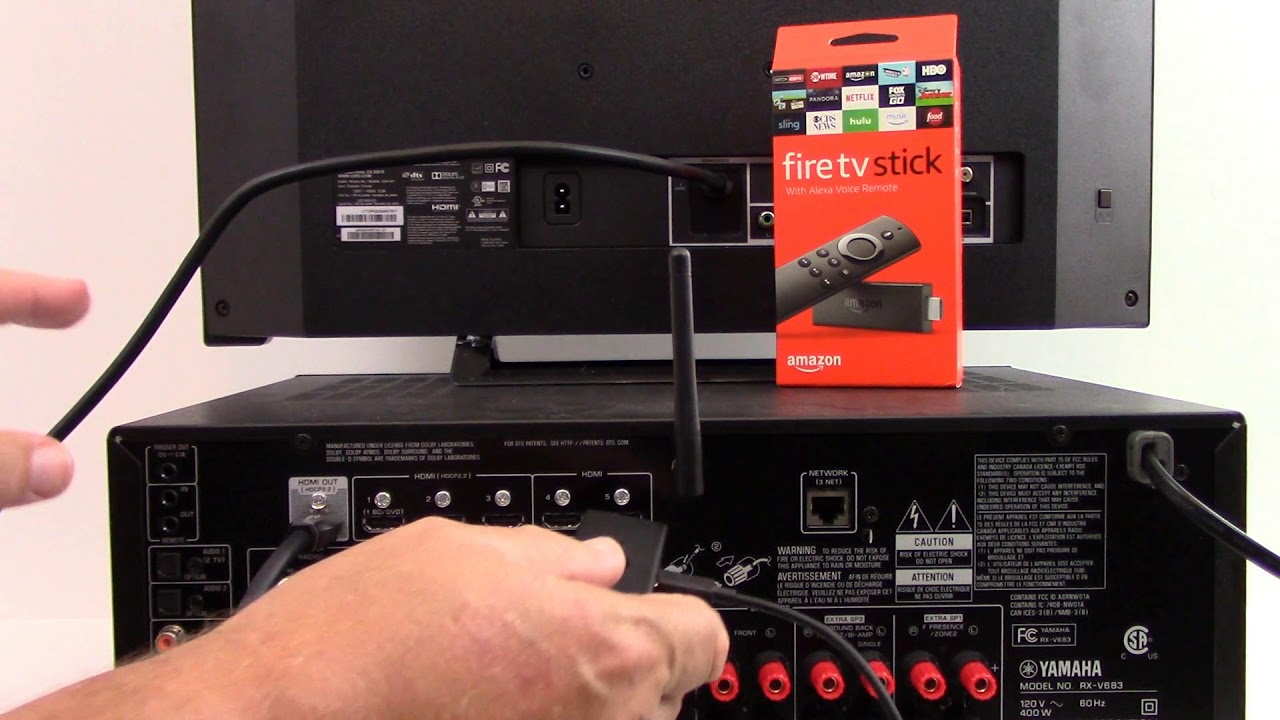
Those that love horror movies will tell you how much of a difference a solid sound system can make, so let us get the devices paired;
How To Connect Amazon Firestick To Denon Receiver
Before getting onto this, you need to ensure your Denon receiver is connected to the sound system and TV correctly.
A misconnection in the system will mess with the sound, and you might not hear anything from the speakers when you.
When connecting the receiver, make sure you use a 4K enable and high-speed rated HDMI. A slow connection will mess with your video quality, and you might end up with worse performance than you would without a receiver.
There is an HDMI port at the back of your receiver, and you need to plug your Amazon Firestick into it.
The Amazon Firestick is a bit big, so it could block the other ports next to it. To avoid this, use the adapter that comes with it, so it takes less space.
It is a more brilliant idea to plug the Firestick directly into the receiver rather than connecting it to the TV.
The receiver will produce sound and video the way you require it, but the TV might not output sound, which is unreliable.
After connecting, you need to review settings to ensure the system works correctly. First, change the receiver to surround sound decode mode since it will give the best-balanced audio for movies and music.
It would help if you also made slight adjustments to your Firestick to make it work better. Go to the audio settings and select automatic or another option of a similar effect. This setting will make it use the best channels to produce high-quality sound.
How To Add Bluetooth To Stereo Receiver
Most people must be wondering if they can connect their headphones to a receiver or play music from a phone through a receiver wirelessly. Using Bluetooth on any device will give you more freedom to move, and you will have fewer wires around your TV.
Most receivers don’t have Bluetooth, so you need to add this option to the setup using some peripherals that you can buy online. Let’s show you how to add Bluetooth to your receiver and enjoy music wirelessly.
To get the music to your Bluetooth headphones, you have to locate the audio output port at the back of your receiver; it should be labeled audio out.
If this is too complex, you can use the phone’s jack at the receiver’s front. Once you’ve found it, connect a Bluetooth transmitter adapter to it.
A potential candidate for the job is the Bluetooth Avantree Oasis. This Bluetooth transmitter supports two headphones, Bluetooth 5,0, and can work both as a transmitter and receiver.
A Bluetooth transmitter will enable the receiver to send audio wirelessly to Bluetooth headphones or speakers; with the recommended product, you can connect two headphones simultaneously and enjoy a personalized experience with a friend.
If you want to stream music to the mobile device, you need to find an audio output port on your receiver, and there are plenty on the back. You need to plug in a Bluetooth receiver instead of a transmitter.
A good choice could be the Avantree RC500 which has a 150-meter range, supports AUX and RCA, and doesn’t have a lip-sync delay. Pair the Bluetooth receiver with the device you want to use for music, and you can have fun.
The receiver will receive audio from your phone wirelessly, transmitting it into the stereo for amplification. You can also connect the AVR to a pair of headphones and speakers simultaneously if one person needs headphones.
It allows independent volume control between the speakers and headphones, and you will need a particular Bluetooth transmitter for this. They have different ways of operating, but here is a fundamental concept for all of them.
Connect your TV output to the transmitter audio input port, then connect the receiver to the transmitter’s output port.
Pair the headphones to the transmitter, and your system and headphones should be ready to run independently of the other.
If you are interested in the feature, your choices are limited to Avantree orbit, Oasis plus, HT5006, HT5009 and Opera.
You can get the Oasis plus since it works as both a transmitter and receiver, and it has all the added features to make it more useful to you.
How To Choose Home Theater Receivers
Instead of telling you which receiver to buy, it is better to give you general knowledge that will guide you when you buy a receiver.
Eventually, you should choose a device based on your requirements and limitations so let us get into it;
1. The number of speakers you plan to use
This part seems obvious, but it is crucial to choose a receiver lest you end up with one that can’t use all your speakers.
If you intend on using more than five speakers and a subwoofer, you have to ensure you get a receiver that can support the additional channels. If you want something like Dolby, make sure your receiver supports it and the number of channels you need.
2. Get the speakers before the receiver
It is essential to pick the speakers before the receiver or know what type of speakers you want so you know the wattage you need to power them.
It is always better to have a receiver that is too powerful since an underpowered speaker will lead to clipping. Having the speaker will allow you to know all the power specifications you need to play your music clearly without damaging the speaker.
3. 4K compatibility
Not everyone has a 4K screen, and you could have a 1080p TV, so you dint need a 4K receiver. You could, however, need to look for 4K compatibility specifically; otherwise, it will ruin your video quality.
The world is moving towards 4K, so you might want to get a 4K compatible receiver now, so you don’t have to replace it in a few years. Most receivers have 4K compatibility, so it might not be a significant concern, but it is worth looking at.
4. Video and audio output quality
It would help if you bought a receiver that matches your TV and speaker sound quality since the whole point is to give you better sound. If you have a 4K Firestick, it seems counterintuitive to get a receiver that can’t support 4K.
When connecting a receiver to a Firestick, it is best to connect it directly to the receiver and not the TV.
This option means that the receiver will have to transmit the video to your TV, which gives it a chance to mess with the video quality if it is a low-end receiver.
A receiver with distortions in the sound will transmit that sound to your speakers. This means that the speakers will sound awful and might get damaged over time. As such, always get a receiver of the highest possible output in your budget range.
5. Connectivity options
It would be best if you had a series of choices regarding connectivity. The more connection platforms you have, the better your experience will be.
A feature you should be keen on is HDMI ARC. This is an audio return channel, and this means that one HDMI cable can send the audio signal from TV to receiver or receiver to TV. This will be a convenient addition to the setup, and you will have an easier time with the connections.
6. Additional Features
All receivers can send audio to speakers, so you need to look at a receiver that offers you more when it comes to a final choice. There are receivers with features such as Dolby atmos.
This new feature improves how your receiver deals with surround sound; thus, you will get much better audio.
A feature like zone control can also help since it allows you to send a second, third, and fourth signal to different house parts.
In one room, you could listen to a blue ray player, and in the other, a phone connected to the same receiver.
Conclusion
You can connect your Firestick to a Denon receiver or any other receiver by plugging t into the HDMI port. You can also connect the Firestick to your TV then connect the TV to the receiver, but this might not work, so you end up with pictures without audio.
When choosing a receiver, make sure it meets all your connectivity needs. If you need to, write down all the devices you intend to connect to it before you go shopping, so you know what ports you expect from your dream receiver.